After creating FASTQ files from my BAM data and learning how to use Terra, I was finally ready to run the Whole Genome Analysis Pipeline. This collection of workflows, called a “workspace,” contains the latest GATK Best Practices workflows for whole genome sequence (WGS) data, including pre-processing, germline short variant discovery, and joint variant calling. Although I am working with a single human genome (my own), this same production pipeline is routinely used on thousands of WGS samples every day.
Being a relative newcomer to GATK and a complete notice with Terra, the path to success was a little bumpy. Before jumping into what I learned, I want to acknowledge the staff at the Broad, who were extraordinarily kind. Starting with with GATK’s Benevolent Dictator for Life, Geraldine Van der Auwera, who is coincidentally the co-author of a highly informative book, Genomics in the Cloud. This blog post would not be possible without the knowledge that I gleaned from those pages. The Terra support team has also been wonderfully responsive–I even received a call from a designer at the Broad asking how they could improve Terra’s user experience!
Below, I describe the reprocessing of my WGS data. The goal is to have a consistent baseline as we continue to search for answers in our genes.
Note: Terra is evolving rapidly, and you may find that some links have changed. These tips were current as of this writing (June 2021). Drop me a line on Twitter if you see an improvement that I can add.
1. Creating unmapped BAM (uBAM) files from paired end files
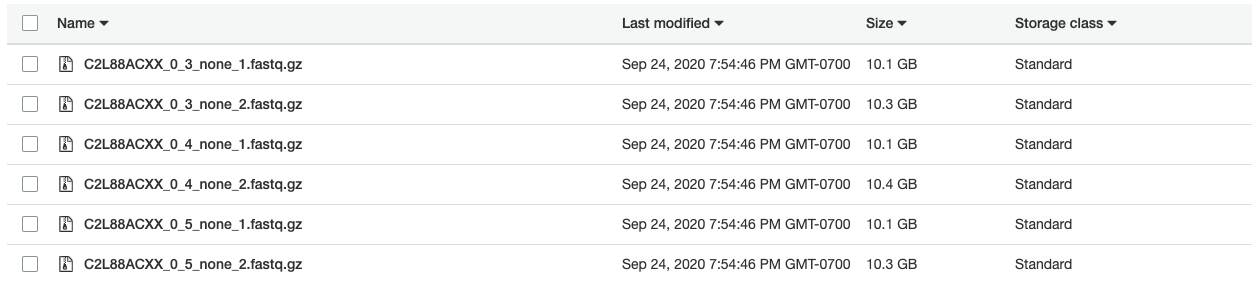
Our family’s WGS data was processed on Illumina sequencers, albeit on different machines at different times. To get started, the first processing step is to create unmapped BAM (uBAM) files from raw FASTQ data. GATK’s use of uBAM files is an acknowledged “off label” use of the BAM file format, but it provides an opportunity to insert details (metadata) that would otherwise be absent. Given Illumina’s 75% market share, chances are high that you will be creating uBAM files using the “Paired FASTQ to unmapped BAM” workflow located in the Sequence-Format-Conversion workspace (or something similar).
2. Read Groups (@RG) in the uBAM file
After creating uBAM files, my first run of the 1-WholeGenomeGermlineSingleSample workflow ended with an error (after three days of processing):
Task UnmappedBamToAlignedBam.CheckContamination:NA:1 failed. Job exit code 255. Check gs://my-terra-bucket/.../call-CheckContamination/stderr for more information. PAPI error code 9. Please check the log file for more details: gs://my-terra-bucket/.../call-CheckContamination/CheckContamination.log.
To start debugging the CheckContamination subtask, I fired up the cloud-based Jupyter notebook within Terra (very cool), attempted to copy the sorted BAM file to the notebook environment, and promptly ran out of disk space. To create enough disk space for your BAM file, go to settings (look for the big gear in upper right corner) and change the persistent disk size to 100 GB.
The cause of this error turned out to be a misunderstanding about read groups. In the BAM file, you can see two different values in the read group (@RG) field: Pickard-K-Thomas_C and Pickard-K-Thomas_A. Those values have to be the same; otherwise, CheckContamination thinks your BAM file has been “contaminated” with multiple samples.
!samtools view sample.sorted.bam | head -n 2

C2L88ACXX_0:5:1303:576005:0	113	chr1	10000	28	30S70M	chr18	3702590	0	CTATGCAGCACACCCAACCAAACCCCATCCATAACCCTAACCCTAACCCTAACCCTAACCCTAGCCCTAACCCTAACCCTAACCCTAACCCTAACCCTAA	0''''0'00''0'0'0'0''7'<'<'0'''''B7<<B'''B<7'7'B<00'0F<BBFBFFFBB'FBFFFFIFFFFBFB<BFFFFB<B<FFFFB<FBFBBB	MC:Z:100M	RG:Z:Pickard-K-Thomas_C	MQ:i:60	AS:i:65
C2L88ACXX_0:3:1101:1473452:0	99	chr1	10001	0	100M	=	10242	288	TAACCCTAACCCTAACCCTAACCCTTACCCTTACCCTTACCCTTACCCTTACCCTTACCCTAACCCTAACCCTAACCCTAACCCTAACCCTAACCCTAAC	BBBFFFFFFFFFFIIIIIIIIIFIIFBFIIBFFIIIIIIIIIIFFIIIIFBFFIIFFIIFI<BFIFF0BFFFBFFFFBB<<BFFFBBF7BBBBBBB77BB	MC:Z:53S47M	RG:Z:Pickard-K-Thomas_A	MQ:i:0	AS:i:70
Searching for read group (@RG) in the BAM file makes the problem even more visible:
!samtools view -H sample.sorted.bam | grep '^@RG'
@RG	ID:Pickard-K-Thomas_A	SM:Pickard-K-Thomas_A	LB:Illumina-PG0001189-BLD	PL:ILLUMINA	PU:C2L88ACXX.0.3	CN:Illumina	DT:2013-12-08T07:00:00+0000
@RG	ID:Pickard-K-Thomas_B	SM:Pickard-K-Thomas_B	LB:Illumina-PG0001189-BLD	PL:ILLUMINA	PU:C2L88ACXX.0.4	CN:Illumina	DT:2013-12-08T07:00:00+0000
@RG	ID:Pickard-K-Thomas_C	SM:Pickard-K-Thomas_C	LB:Illumina-PG0001189-BLD	PL:ILLUMINA	PU:C2L88ACXX.0.5	CN:Illumina	DT:2013-12-08T07:00:00+0000
The fix for read groups in the uBAM file
The fix was to go back to Sequence-Format-Conversion and change three values in WORKFLOWS>INPUTS, which in turn inserts the correct metadata in your uBAM files–many thanks to Geraldine for pointing this out:
- Change
readgroup_namefromthis.read_grouptothis.read_group_id - Change
sample_namefromthis.sample_idtothis.sample - Change
additional_disk_space_gbto100
Other notes:
- This article was invaluable to understand how read groups (@RG) work.
ID(Read Group IDentifier) field: Each ID value must be unique.SM(SaMple) field: Unlike ID, the sample name must be the same in all SM fields.LB(LiBrary) field: I referenced my unique Illumina ID for DNA prep library traceability.PL(PLatform) = ILLUMINA (all caps)…I read an official list of sequencers in the documentation and “ILLUMINA” is on that list.PU(Platform Unit) field: The convention is to use periods as the delimiter in the lane identifier, not underbars as used in the FASTQ filename.CN(Sequencing CeNter) field: I used “Illumina” because they processed this sample.DT(DaTe) field: Using the ISO 8610 combined date/time standard worked for me. Interestingly, Terra converted my local time to UTC time inside the BAM file (which makes sense given that genomes can be processed across multiple timezones).
From the Sequence-Format-Conversion workflow, here’s my successful DATA>TABLE>read_group page in tsv format:
entity:read_group_id	output_unmapped_bam	fastq1	fastq2	library_name	platform_name	platform_unit	run_date	sample	sequencing_center

Pickard-K-Thomas_A	gs://my-terra-bucket-id/.../Pickard-K-Thomas_A.unmapped.bam		gs://my-bucket/Pickard-K-Thomas/FASTQ/C2L88ACXX_0_3_none_1.fastq.gz	gs://my-bucket/Pickard-K-Thomas/FASTQ/C2L88ACXX_0_3_none_2.fastq.gz	Illumina-PG0001189-BLD	ILLUMINA	C2L88ACXX.0.3	2013-12-07T23:00:00-08:00	Pickard-K-Thomas	Illumina

Pickard-K-Thomas_B	gs://my-terra-bucket-id/.../Pickard-K-Thomas_B.unmapped.bam		gs://my-bucket/Pickard-K-Thomas/FASTQ/C2L88ACXX_0_4_none_1.fastq.gz	gs://my-bucket/Pickard-K-Thomas/FASTQ/C2L88ACXX_0_4_none_2.fastq.gz	Illumina-PG0001189-BLD	ILLUMINA	C2L88ACXX.0.4	2013-12-07T23:00:00-08:00	Pickard-K-Thomas	Illumina

Pickard-K-Thomas_C	gs://my-terra-bucket-id/.../Pickard-K-Thomas_C.unmapped.bam		gs://my-bucket/Pickard-K-Thomas/FASTQ/C2L88ACXX_0_5_none_1.fastq.gz	gs://my-bucket/Pickard-K-Thomas/FASTQ/C2L88ACXX_0_5_none_2.fastq.gz	Illumina-PG0001189-BLD	ILLUMINA	C2L88ACXX.0.5	2013-12-07T23:00:00-08:00	Pickard-K-Thomas	Illumina
Creating uBAM files took about four hours at a cost of $1.15. It was time for a second run of the 1-WholeGenomeGermlineSingleSample workflow.
3. CheckFingerprint issue #1
This time, the sticking point was at the end of the pipeline in a routine called CheckFingerprint, which is called as a subtask within AggregatedBamQC. Here’s the error (also found after three days of processing):
Job AggregatedBamQC.CheckFingerprint:NA:1 exited with return code 1 which has not been declared as a valid return code. See 'continueOnReturnCode' runtime attribute for more details.
I checked the CheckFingerprint.log and suspected the issue was related to the NA12878 dataset (what was that doing there???):
WARNING 2021-05-11 21:25:40 FingerprintChecker Couldn't find index for file /cromwell_root/dsde-data-na12878-public/NA12878.hg38.reference.fingerprint.vcf going to read through it all.
WARNING 2021-05-11 21:25:40 FingerprintChecker There was a genotyping error in File: file:///cromwell_root/dsde-data-na12878-public/NA12878.hg38.reference.fingerprint.vcf
Cannot find sample 1-WholeGenomeGermlineSingleSample_2021-05-09T05-11-16 in provided file.
The fix for CheckFingerprint issue #1
After some head scratching, I found the solution by scrolling to the bottom of WORKFLOWS>INPUTS. There, I found a field called fingerprint_genotypes_file, which had a value of: gs://dsde-data-na12878-public/NA12878.hg38.reference.fingerprint.vcf
Clearing this field fixed the issue, and I launched 1-WholeGenomeGermlineSingleSample for the third time.
Note: When debugging your problem, keep in mind that searching the Terra knowledge base does not include results from GATK documentation, which can be very useful for GATK- or Picard-related issues.
4. CheckFingerprint issue #2
The third run was also unsuccessful–this time the issue was a little trickier. Here’s the error message (also found after three days of processing!):
INFO 2021-05-11 21:27:00 CheckFingerprint Read Group: null / Pickard-K-Thomas vs. 1-WholeGenomeGermlineSingleSample_2021-05-09T05-11-16: LOD = 0.0
ERROR 2021-05-11 21:27:00 CheckFingerprint No non-zero results found. This is likely an error. Probable cause: EXPECTED_SAMPLE (if provided) or the sample name from INPUT (if EXPECTED_SAMPLE isn't provided) isn't a sample in GENOTYPES file.
The fix for CheckFingerprint issue #2
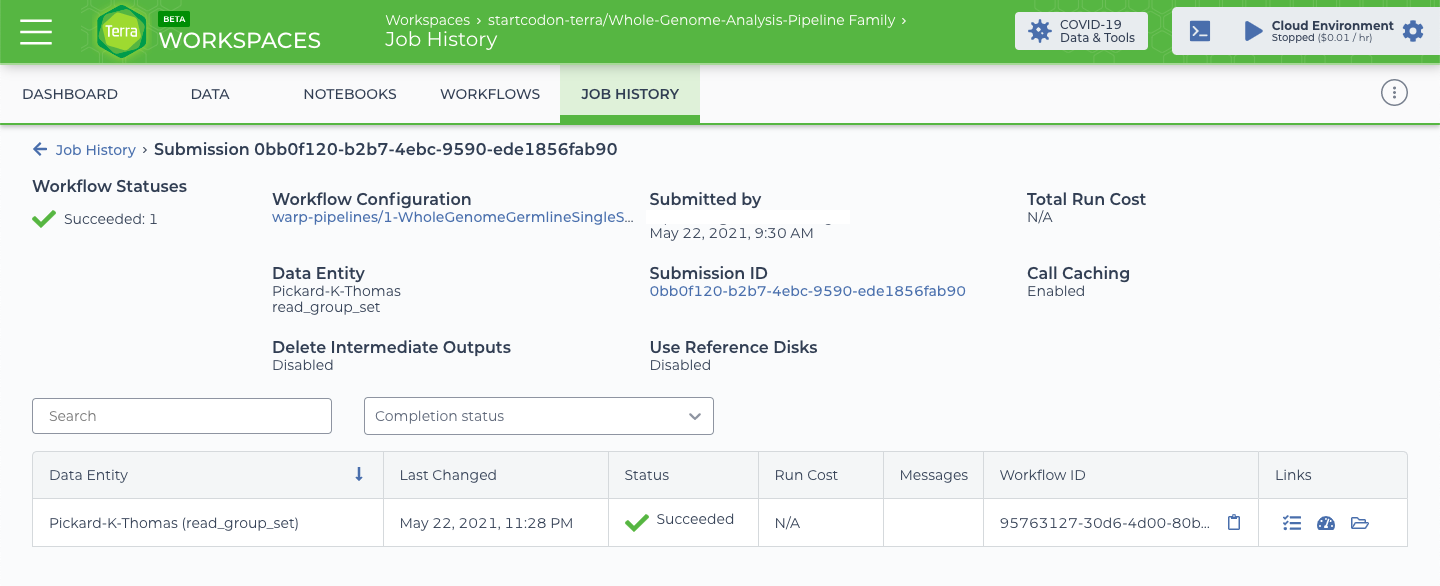
It turns out that the saved name of your WORKFLOWS>root entity>read_group_set must match the name of your VCF output (in my case, Pickard-K-Thomas). In the error message above, the default read_group_set name (1-WholeGenomeGermlineSingleSample_2021-05-09T05-11-16) does not match, but is stored as the value in read_group_set_id in DATA>read_group_set . Saving the read_group_set name as “Pickard-K-Thomas” fixed the issue. The alternative is to change the value of WORKFLOWS>INPUTS>sample_and_unmapped_bams, which uses read_group_set_id by default. Yikes!
Note: Understanding the standard data model is critical to your success. This article, chapters 11 and 13 in Genomics in the Cloud, and these videos will assist in wrapping your head around it. I found the data model to be the most challenging part of this process.
I launched 1-WholeGenomeGermlineSingleSample for the fourth time, but aborted it after four days of processing (thinking that the software was broken).
5. Improving process delays
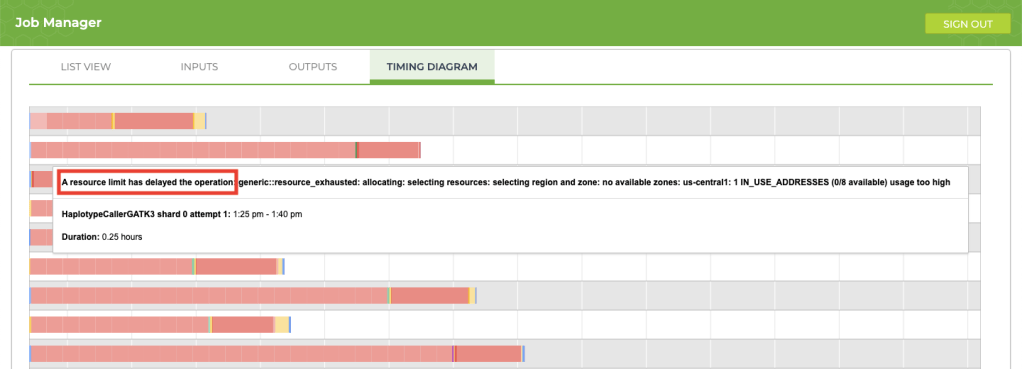
If your job is taking longer than usual (say, an extra 12+ hours), take a look at the timing diagram in the Job Manager. If you see a bunch of pink boxes, it’s time to submit a request to Terra Support for more resources. To submit support requests, you must create a Zendesk account that is separate from your Terra account. The good news is that the support account that you create for Terra will also be valid for questions that you submit to the GATK Community Forum.
This article provides an excellent overview explaining how to request additional resources for your project. In my case, I wanted my jobs to run 30% faster, so I requested an increase for resources that were limited (IP addresses and CPUs). After forwarding my request, the support team took care of my request immediately and the issue completely disappeared. Here is the information that I provided for the request:
- Your Terra billing project: YOUR-BILLING-PROJECT-GOES-HERE
- Which quota(s) you want to increase: IP addresses and CPUs
- What you want your new quota(s) to be: 30% higher than what they are now
- Which regions you want the increase applied to, if applicable: us-central1
- Rationale for increase: Research purposes
6. Information to include when submitting a support request
If you followed the instructions in the previous step, you are ready to submit support requests. Providing these items in your request will speed-up the process:
- Your Project ID
- Your workspace name
- Your Bucket ID, Submission ID, and Workflow ID
- Any useful log information
You may also be asked to share your workspace with the support team. To do this, add the email address GROUP_FireCloud-Support@firecloud.org to your workspace by clicking the Share button–the option is located in the three-dots menu at the top-right.
7. Cleaning up
My fifth run was successful! Now it was time to clean-up.

After learning how to use this workflow and running it unsuccessfully a few times, I had amassed a significant amount of storage. To wit:
$ gsutil du -s gs://my-terra-bucket-id
3,994,577,017,810  gs://my-terra-bucket-id
Holy smokes–about 4 terabytes, which costs more than $50 USD per month using standard Google cloud storage. At runtime, you can automatically delete intermediate files with an option that removes files for workflows that complete successfully. Since I was learning, I kept them around and then used the Remove_Workflow_Intermediates notebook to remove them manually.
To begin cleaning-up, I removed all subdirectories with failed runs (but not the notebooks directory):

Next, I looked at the size of the directory from my successful run, about 864 gigabytes:
$ gsutil du -s gs://my-terra-bucket-id/my-submission-id
863,761,741,217  gs://my-terra-bucket-id/my-submission-id
To manually delete the remaining intermediate files, I copied this notebook to my workspace. Note: Before running it, I upgraded to the latest version of pip and google-cloud-bigquery with this command:
!/usr/local/bin/python3 -m pip install --upgrade pip
!pip install --upgrade google-cloud-bigquery
Within the notebook code, I also modified the pip command to upgrade to the latest library versions with this command:
!pip install --upgrade $install_cmdThe program found 463 intermediate files to delete (Note: 782.61 GiB = 840 gigabytes).
WARNING: Delete 463 files totaling 782.61 GiB in gs://my-terra-bucket-id (Whole-Genome-Analysis-Pipeline)
Are you sure? [y/yes (default: no)]: yes
After executing the cleanup code, I reduced total storage for the successful run by 97%, from about 864 to 23 gigabytes, which now costs less than $0.50 USD per month using standard Google cloud storage. The largest savings came from storing the uncompressed BAM file (previously 80 gigabytes) as a compressed CRAM file (16 gigabytes). My take-home: It pays to pay attention to unnecessary files!
Conclusion
After building uBAM files correctly, reprocessing my genome would typically cost about $7 USD and three days of compute time. It took five runs to get it right, but Terra’s call caching magic–and perhaps the additional CPU power that I requested–brought the last runtime down to 14 hours. It has been a steep climb, but the views are great. Next up: reprocessing WGS data for the rest of our family, and then joint variant calling.